
Wear OS screen mirroring
This page contains the user manual for alfacast application. This complete instruction is useful for people who want to learn how to use alfacast screen mirror app on Wear OS. To use Wear OS screen mirroring feature with alfacast app, you need one or more of the following devices: smart watches, wearable device or other Wear OS compatible device. Your device must have Google Wear OS operating system installed.
Alfacast is a screen mirroring app with streaming and viewing features. For the best understanding of this user manual, whenever the Wear OS screen mirroring feature is mentioned, it means alfacast app is used to mirror the screen on your Wear OS device. You can find more detailed info about alfacast app on Home page. In this user manual we will show you how to use the application and tell you about its main functions.
Main app features
Our Wear OS screen mirroring solution is available in two versions. There are two separate versions of alfacast application: regular (alfacast) and extended (alfacast x). Below is a list of the app’s main features:
• Audio and video stream splitter for simultaneous real time streaming of content to multiple devices (up to 8 channels).
• Streaming through all network interface types: Wi-Fi, Bluetooth.
• Screen streamer and viewer within local area network.
• Serverless single channel peer-to-peer streaming technology.
• Serverless multichannel peer-to-many streaming technology.
• Low latency playback. This feature is only available in the extended version of the app.
• Video streamer & viewer up to SCIF quality and 30 FPS in the regular app version.
• Video streamer & viewer up to 4K Ultra HD quality and 60 FPS in the extended app version.
• Automatic discovery of users on the local network.
• Secure connection with end-to-end AES-128 encryption technology in the regular app version.
• More secure connection with end-to-end AES-256 encryption technology in the extended app version.
The extended version of the application differs from the regular version by its more advanced functionality and capabilities. Everything described here applies to both versions of the application (regular and extended), unless the different behavior of the two versions is explicitly described. More detailed information about the differences between the two versions of the app will be provided later in this user guide.
System requirements
Please note, alfacast app has some requirements to use the Wear OS screen mirroring feature:
• Google Wear OS operating system with minimum version 6.0.
• Minimum RAM size: 512 MB. Recommended RAM size: 2 GB.
• Minimum CPU: 1 GHz single-core. Recommended CPU: 1.5 GHz quad-core.
• Minimum display resolution 240×240 pixels.
• Minimum 100 Mbps router. Recommended 1 Gbps 5 GHz Wi-Fi router.
• Supported CPU architectures: AMD64, I386, ARM64, ARMHF.
• Minimum 100 MB disk space.
• Support IPv4 networks only.
• The devices should be connected to the same network.
• The operating system must support the following video codecs: H.264, H.265, VP8, VP9 (hardware accelerated or software).
4K Ultra HD resolution and 60 FPS requirements
Please check the following points to ensure proper support for 4K Ultra HD Wear OS screen mirroring on your devices:
• Extended version of application on streamer and viewer side.
• Display with 4K Ultra HD resolution and 60 Hz on streamer side. Please note: Wear OS devices do not have a large display with 4K Ultra HD resolution. On the other hand, our software is limited to 4K Ultra HD video resolution. Theoretically, 4K Ultra HD broadcasting is supported by the app; you should provide a display with this resolution.
• Hardware accelerated H.264, H.265, VP8, VP9 video codec with 4K Ultra HD support.
• The final video stream resolution and refresh rate depends from the maximum resolution and refresh rate of streamer’s display, current video codec configuration and network bandwidth.
The application supports
For a better understanding, we provide the following list of features that our application supports:
• Streaming audio and video from your screen.
• Playback audio and video on the side of the viewer.
• Screen streamer and viewer in one application.
• Audio and video splitter for simultaneously streaming screen content to multiple devices in real time.
• Secure connection with end-to-end encryption.
• Display current streaming information.
• Automatic users discovery in the local area network.
• Wear OS screen mirroring with a local network connection only.
The application does not support
To avoid any misunderstandings, we provide the following list of what our application does not support:
• Alfacast is not DLNA™, UPnP™ media render or media server.
• Alfacast is not Apple AirPlay™ receiver or transmitter.
• Alfacast is not Google Chromecast™ receiver or transmitter.
• Alfacast is not Miracast™ receiver or transmitter.
Alfacast is an independent Wear OS screen mirroring application based on proprietary streaming technology. As a result, the user has to install alfacast app on both sides: on the streamer and on the viewer devices.
Installing and uninstalling the app
As we mentioned earlier, our Wear OS screen mirroring solution is available in two separate app versions. You can find current links to the application on our Downloads page.
Figure 1. Alfacast application icons for Wear OS.
The regular (left) and extended (right) versions
Figure 1 shows two app icons. On the left is the icon for the regular version of the “alfacast” app. On the right is the icon for the extended version of the “alfacast x” app. We use our website to distribute app for Wear OS. Please download the app package directly to your device or use a USB drive to install. After a successful download, you need to install the APK file on your device using any method: through a file manager, or using the adb command. If the setup app (file manager or adb command) asks for permission to install the APK package, please grant this permission. The application is available in the standard Applications Menu on your Wear OS device immediately after successful installation.
The application is removed in the usual manner for a Wear OS device. Press and hold the app icon. The standard Wear OS app action menu will appear. Select an action from the list – Uninstall or Remove app. You can also use the adb command to uninstall the app.
As we can see, the installation and removal of the application is carried out in the standard way using APK files for a device based on the Wear OS.
App permissions
The screen mirroring function combines two main features: screen capture and audio capture. Wear OS requests permission to capture screen and record sound. Please provide all necessary permissions for the application to function properly.
The application also requests permissions in the following cases:
• At the start of the application. Permissions to send notifications (Wear OS 13 and above).
• On selecting a user avatar image from files or a photo library. Permissions to read data from your device’s disk.
Later in this user manual, we will examine in more detail all requests for access to the required permissions.
Launching the application
Please tap on the application icon from the Applications Menu and launch it. On launch the application, it will initialize and you will see the window shown in the following figure.

Figure 2. Application splash screen window
After some time, the app will show Main application window with controls. The Main application window displays the streaming devices found on the local network in a special area, see the following figure.
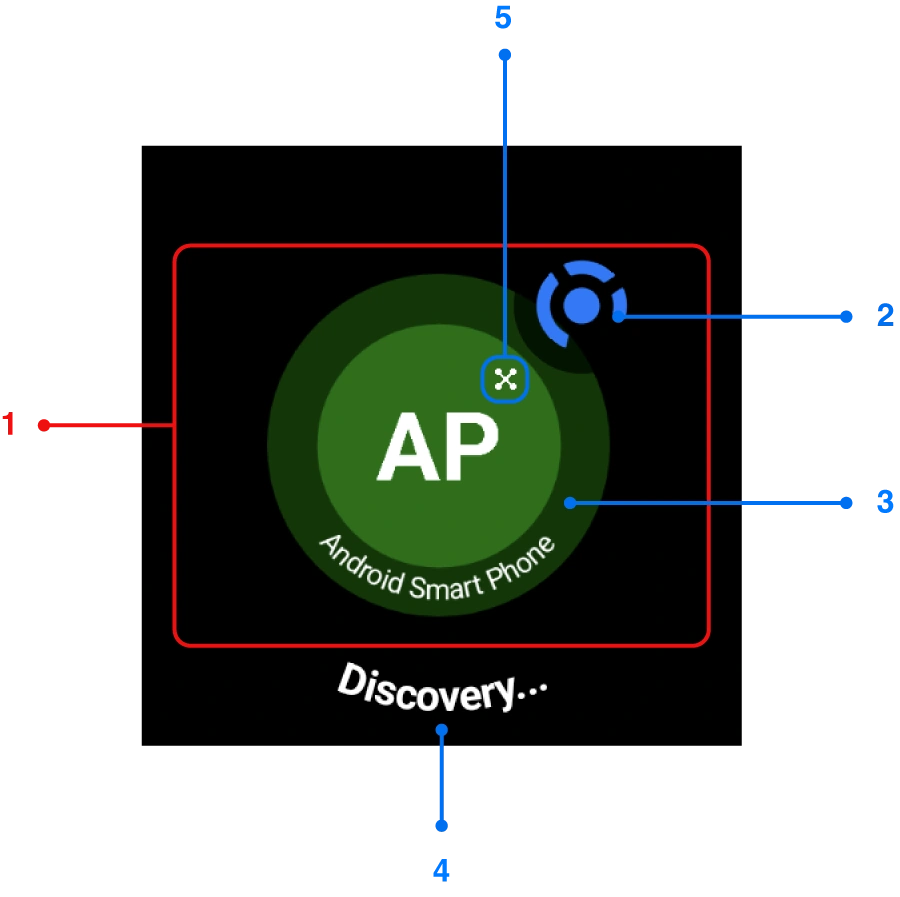
Figure 3. Main application window
The Main application window contains the following controls:
1 – Display area of discovered network nodes. List of network nodes with streamer functionality.
2 – Options button. Show and hide options menu.
3 – Network node icon with name – “Android Smart Phone“.
4 – Current status of the application with activity indicator. The values for this field can be:
• “Initializing…” – the application is in the initialization state.
• “Please wait…” – need to wait for some time.
• “No connection” – there is no network connection on your Wear OS device.
• “Discovery…” – the application is ready to work and is discovering all network nodes within the local network.
5 – Multichannel streamer mode indicator. This indicator always appears on network nodes with enabled multichannel streaming mode.
In this manual we will use the concept of a network node – this is a network host on which alfacast application is running. Alfacast is both a streaming and a viewing app. Accordingly, each network node may have either the streaming function, the viewing function, or both functions available. Wear OS based network nodes support both streaming and viewing functions to provide Wear OS screen mirroring functionality.
Navigation in the application is carried out in the standard way, as on any device based on the Wear OS. The back navigation button on your Wear OS device is used to exit the current window. This user manual shows the full contents of windows. On Wear OS devices, windows are partially displayed, and you must scroll to see the full contents. To scroll through the contents of a window, you can use gestures or the physical scroll wheel on your device (if you have one).
After starting, the application immediately tries to detect all network interfaces and start the network node discovery process on each network interface. If no network interfaces are detected, you will see the corresponding application status – “No connection“. In this case, you should provide at least one network interface to start the network node discovery process. Please connect to the Wi-Fi router. If the network interface is present, the application will change its status to – “Discovery…“. The “Discovery…” status means that network discovery is currently in progress. The discovery process is typically quick and takes no more than 30 seconds.
To display the application’s Options menu, click the Options button. After clicking the Options button, the Options window will appear, see the following image.
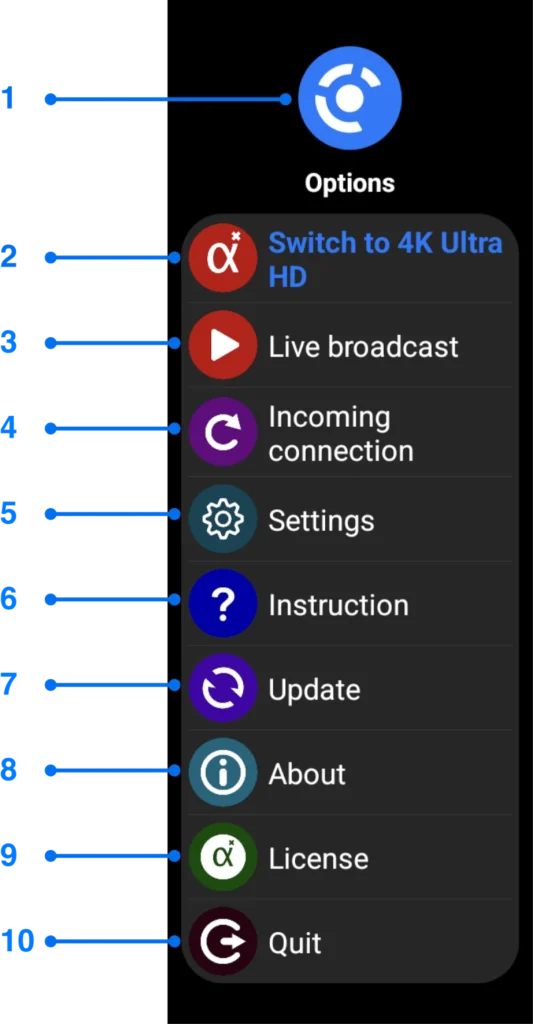
Figure 4. Options window with menu
The Options menu contains the following controls:
1 – Options menu icon.
2 – 4K Ultra HD switch button. This button is used to review with the extended version of the application.
3 – Live broadcast button. The button switches the streamer to multichannel streaming mode.
4 – Incoming connection button. The button opens a window with information about the incoming connection.
5 – Settings button. The button opens a window with the application settings.
6 – Instruction button. The button opens a window with instructions for the application.
7 – Update button. The button opens the application update window.
8 – About button. The button opens a window with information about the application.
9 – License key button. The button opens a window with license key information.
10 – Quit button. This button completely terminates the application.
The 4K Ultra HD switch button is a reminder that there is a more advanced, extended version of the app. This button is only available in the regular version of the app and is hidden in the extended version. Click this button to see options for switching to the extended version of the application.
The functionality of all buttons is discussed further, please see the following sections of this user manual. A description of how the Live broadcast button works can be found in the Multichannel streamer section of this manual.
Interacting with the Incoming connection button is described in the Incoming connection section. For more information on how the Instruction button and About button works, please refer to the App instruction and About sections. The Settings button is described in the App settings section.
For information on how to update the app and how the Update button works, see the App update section.
Click the License key button if you have one and want to activate it. All necessary steps for activating the license key are described in the App license key activation section.
The display area of discovered network nodes will reflect all detected network nodes with steaming function. In simple terms, these are streamers on your local network. To start the Wear OS screen mirroring process, you need to select a network node from this area. Click on any network node to start the playback process.
The Multichannel streamer mode indicator is displayed if the network node has enabled multichannel streaming mode. The multichannel streaming mode is described further in this user manual.
If you switch to another application or send the application to the background by pressing the back button, the application will continue to work in the background: detecting network nodes and waiting for incoming connections. To fully terminate the app, tap the Quit button. This action will shut down all background services and close the app. Only the unused and uninitialized Main application window will remain in the list of recent apps.
Below we provide a description with the minimum set of steps to start streaming or viewing on your Wear OS device.
Steps for screen streaming
To start streaming your display with Wear OS screen mirroring feature, please follow the steps below on your streaming device:
• Download alfacast application on your devices.
• Connect your devices to the same network.
• Run alfacast application on your devices.
• Now you are ready to accept incoming connection.
Steps for screen viewing
To start viewing remote display with Wear OS screen mirroring feature, please follow the steps below on your viewing device:
• Download alfacast application on your devices.
• Connect your devices to the same network.
• Run alfacast application on your devices.
• Wait end of the discovery process (approximately 15-30 seconds).
• Select the required streamer from the list and wait end of the connection process.
• Now you will view remote screen.
App notifications
The application will generate notifications while it is running. App notifications are important, and we recommend leaving them enabled. In the following figure you can see an example of a notification from alfacast application on Wear OS.
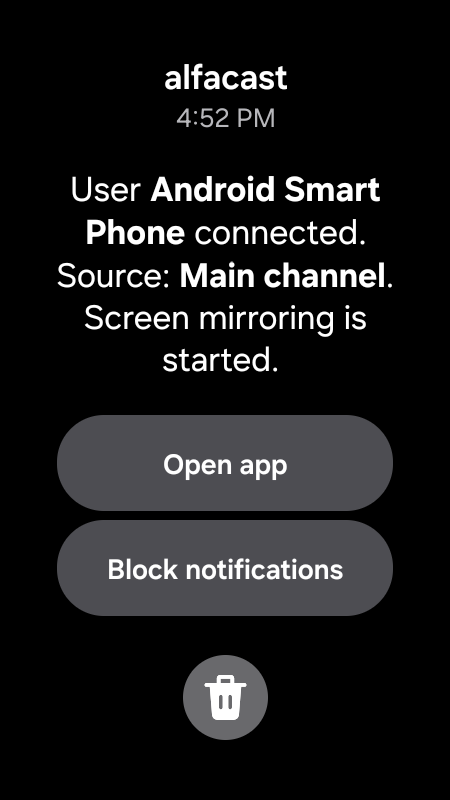
Figure 5. App notifications
The app will send notifications every time the user connects or disconnects, as well as informational, warning, error, and other messages. At launch, the app will ask you for permission to send notifications (Wear OS 13 and above).
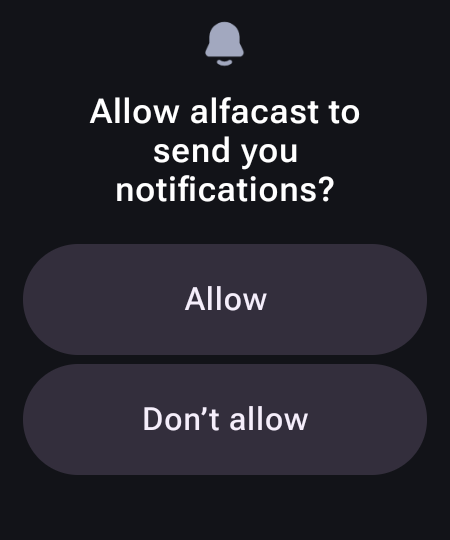
Figure 6. App requests notification permissions
Please click the Allow button to receive notifications from the application. If you do not want to receive notifications related to Wear OS screen mirroring, click the Don’t allow button.
Screen streaming
All Wear OS based network nodes already have the streamer option enabled. There is no need to enable streaming in the app separately – this option does not exist. The Wear OS screen mirroring streamer feature is always enabled after launching the app.
To establish an incoming connection on the broadcasting device, follow the steps to start streaming and make it active (on top of other application windows). On the viewing device, follow the steps to start viewing.
Screen capture permission must be granted each time a new incoming connection is established. If you do not grant screen capture permission, the connection between the streaming device and the viewing device will be terminated. When establishing an incoming connection, the app will also request permission to record audio. You can deny permission to record audio if you do not want to grant the app access to the Wear OS audio subsystem or simply do not want to transmit audio during the broadcast.
On initiating an incoming connection, the app will request permission to access your audio device firstly. You will see the following dialog box.
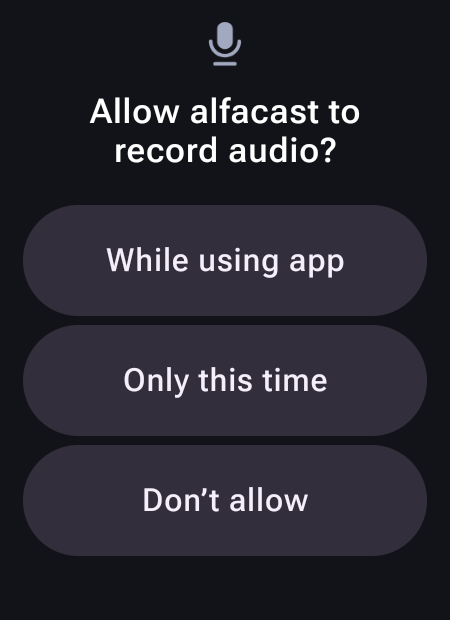
Figure 7. Start audio streaming dialog box
If you click the Don’t allow button, the audio capture will not be performed and the incoming connection initiation will still continue. Please click the While using app button or Only this time button if you want the application to capture audio. The request for permission to access audio recording only occurs if you have enabled the Audio capture option in the app settings (see the App settings section below) and your Wear OS device has audio input sources: microphone or Bluetooth headset.
Once you have chosen the audio capture option, the application will ask for permission to capture screen from your device.
When an incoming connection is established, you will see the following dialog box.
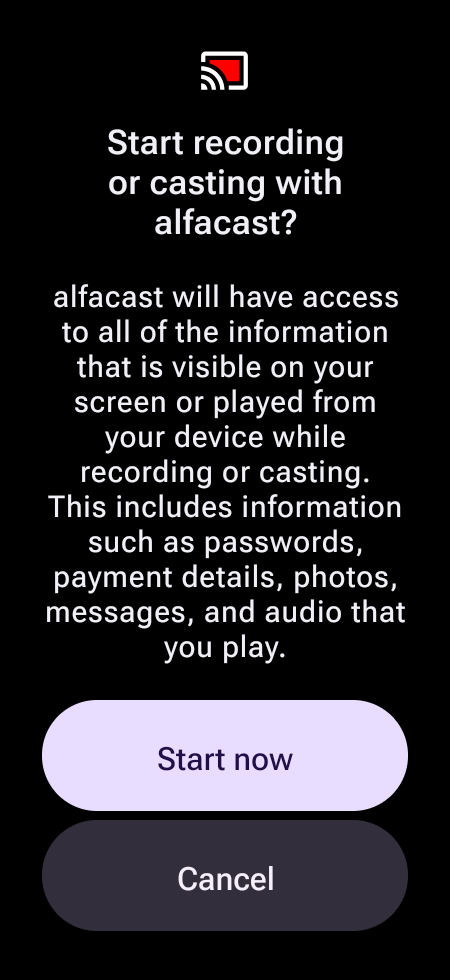
Figure 8. Start video streaming dialog box
This dialog box presents two buttons to choose from. Click the Start now button when you are ready to begin broadcasting. If you change your mind or want to cancel the broadcast, click the Cancel button. Please remember that once the broadcast starts, the video image will be captured entirely from the screen of your device.
All incoming connections and disconnections are notified. There are two streaming modes: single channel (enabled by default) and multichannel mode (see below).
Screen viewing
To start viewing content from a remote screen, you have to select a network node in the Main application window. After selecting a network node please tap on it, a Playback window will open, see below.
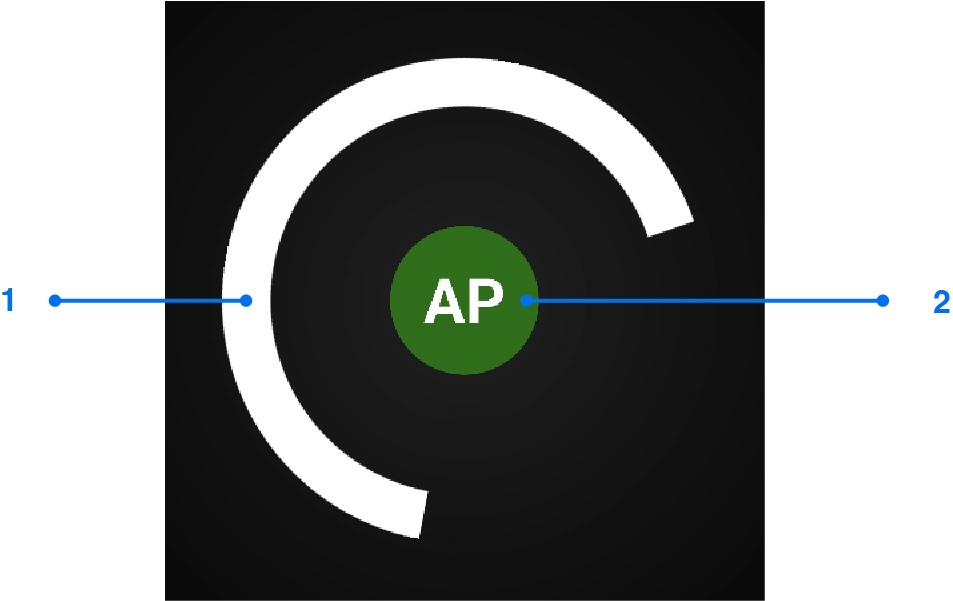
Figure 9. Playback window
At the connection stage, the Playback window contains the following elements:
1 – Activity indicator.
2 – Network node avatar image.
We have shown above the appearance of the Playback window before the content playback process starts. All of the above elements are static and serve to display the current state of the connection. If the connection cannot be established within one minute, the playback window closes automatically. If the connection is successfully established, controls will become available in the Playback window, see below.
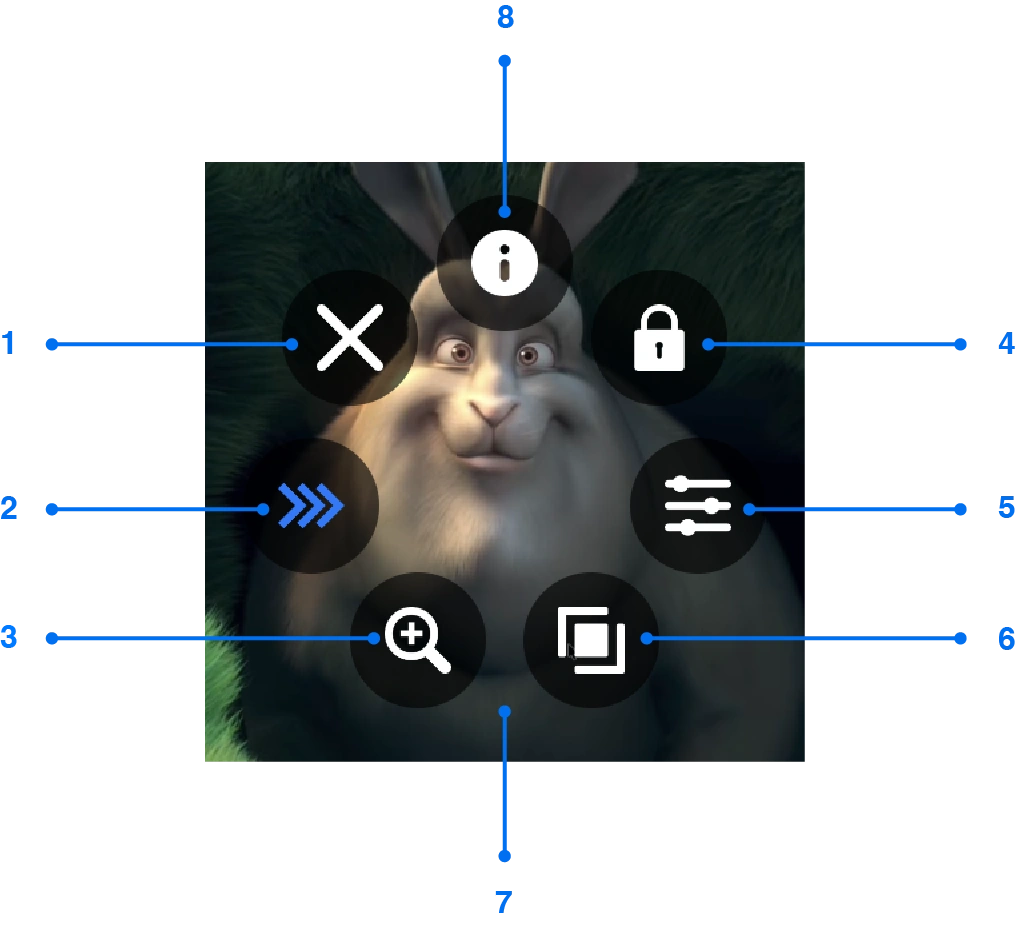
Figure 10. Playback window after successful connection
At the playback stage, the Playback window contains the following controls:
1 – Close button. The button terminates the outgoing connection.
2 – Get low latency button. This button is used to review with the extended version of the application.
3 – Scale button. The video scale value changes after each press in a circle. Video scale values can be as follows:
• “No scale” – do not scale the video image.
• “Crop” – an automatic video image cropping mode. It crops the video image based on the window size and aspect ratio of the original video frame: horizontally or vertically.
• “Horizontal” – crops the video image horizontally.
• “Vertical” – crops the video image vertically.
• “100 %” – 100 percent of the original video image.
• “125 %” – 125 percent of the original video image.
• “150 %” – 150 percent of the original video image.
• “200 %” – 200 percent of the original video image.
• “250 %” – 250 percent of the original video image.
• “300 %” – 300 percent of the original video image.
• “400 %” – 400 percent of the original video image.
• “25 %” – 25 percent of the original video image.
• “50 %” – 50 percent of the original video image.
• “75 %” – 75 percent of the original video image.
4 – Screen lock button. This button locks the on-screen controls.
5 – Picture button. Video image adjustment button. Clicking this button opens a window with elements for adjusting the video image.
6 – Aspect ratio button. The video aspect ratio value changes after each press in a circle. Video aspect ratio values can be as follows:
• “Default” – do not change the video aspect ratio, use the same aspect ratio as on the remote screen.
• “Stretch” – the video aspect ratio will be the same as the aspect ratio of the Playback window.
• “16:9” – video aspect ratio 16:9.
• “16:10” – video aspect ratio 16:10.
• “21:9” – video aspect ratio 21:9.
• “1:1” – video aspect ratio 1:1.
• “2:1” – video aspect ratio 2:1.
• “4:3” – video aspect ratio 4:3.
• “5:4” – video aspect ratio 5:4.
• “3:2” – video aspect ratio 3:2.
7 – Content from a remote screen. Playing video content is the main purpose of the Playback window.
8 – Information button. Click by this button to open a window with information about the current stream.
To finish the current playback session, simply click the Close button, this will automatically disconnect you from the streamer. Pressing the back button on your device will perform the same action.
To ensure a comfortable viewing experience when you use the Wear OS screen mirroring feature, we provide the following additional controls in the Playback window.
You can lock all controls on the Playback window by clicking the Screen lock button. After this, only one Unlock button will be available in the center of the Playback window. To fully restore controls in the Playback window, click the Unlock button.
The Picture button shows additional elements where you can adjust the video image by: brightness, contrast, saturation or hue. Not all video decoders and video renderers support this feature, and this feature is also unavailable on some video resolutions. If this feature is unavailable and you need it, try to change the video decoder in the app settings. Click on this button and the application will show additional elements as shown in the image below.
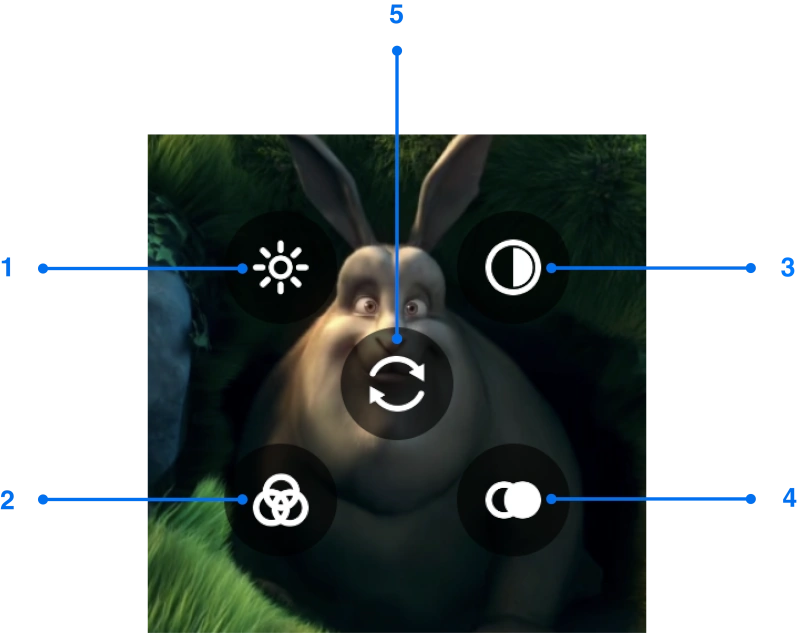
Figure 11. Picture adjustments elements
The Picture adjustments elements contain the following components:
1 – Brightness button.
2 – Saturation button.
3 – Contrast button.
4 – Hue button.
5 – Reset button. Reset all video image settings to default values.
Press buttons 1-4 to display the items for changing the settings of their image. After clicking on the selected button, the application will show controls for changing the settings, see the following figure.
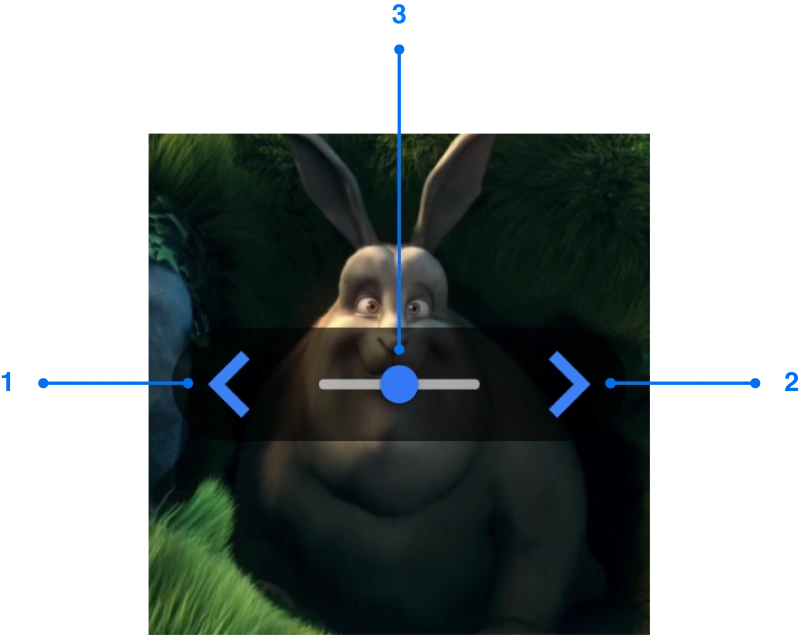
Figure 12. Picture adjustments control elements
The Picture adjustments control elements contain the following components:
1 – Left button.
2 – Right button.
3 – Control slider.
You can adjust the video image level using the Control slider and pressing by Left button or Right button. Video picture settings are saved and applied to subsequent playback sessions. To return video picture settings to default values, click the Reset button. To return to the main menu, press the back button or tap the screen to completely close the video options.
Click the Aspect ratio button to give the video image the shape you need. The Aspect ratio button changes the aspect ratio of the currently playing video frame. To understand how it works, try using it: click several times and you will see the effect on the displayed video image.
To scale the video frame image, use the Scale button. This button allows you to zoom in, zoom out or crop the video image. Similarly, to understand how it works, try using it: click several times and you will see the effect on the displayed video image. Sometimes this feature is limited and you can scale the image by 25, 50, 75 and 100 percent. In this case, the scaling percentage is calculated based on the size of the Playback window, not the size of the original video frame. This limitation is due to the fact that not all video decoders and video renderers support this feature, and it is also limited for some video resolutions. If this feature is limited and you need it, try to change the video decoder in the app settings.
The settings for these two values (scale and aspect ratio) are not stored and are set to default when starting a new video playback session.
The Get low latency button is only available in the regular version of the app and is hidden in the extended version. Click this button to see options for switching to the extended version of the application.
To view current information about a stream, click the Information button. Click on this button and the application will show additional elements as shown in the image below.
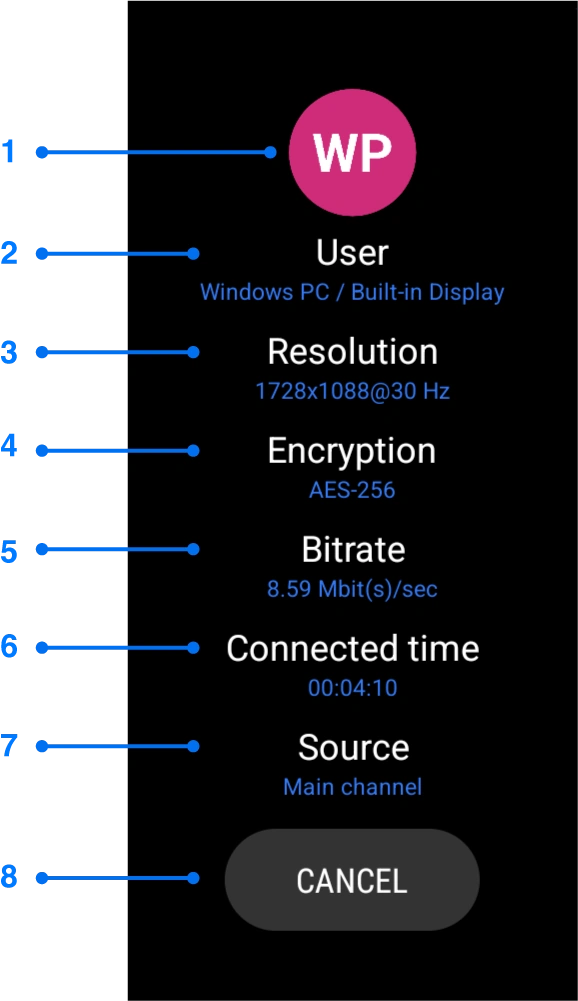
Figure 13. Stream information elements
The Stream information elements contain the following components:
1 – Network node avatar image.
2 – Name of the remote network node and display name.
3 – Current video stream resolution.
4 – Current encryption method.
5 – Current bitrate of the stream.
6 – Current connection time.
7 – Currently selected channel.
8 – Cancel button.
The Stream information elements display all the necessary information about the stream. These are: current video resolution, current bitrate, encryption method, connection time and source. This information is updated once per second. Click the Cancel button to hide the stream information.
If the streamer is in single channel mode, the main channel is selected for connection. If the streamer is in multichannel mode, you will be prompted to select a channel at the connection establishment stage, see the next window.
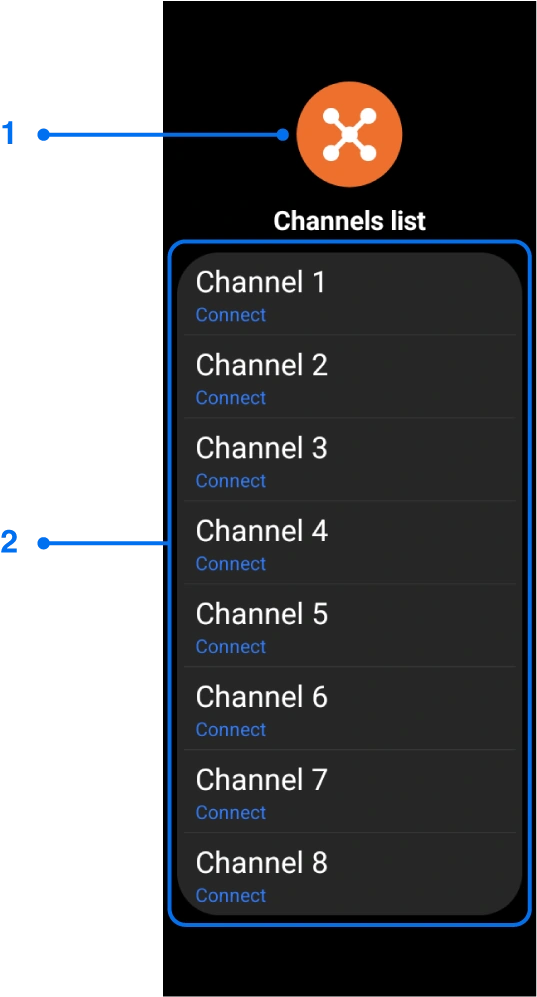
Figure 14. Channels list window
The Channels list window contains the following controls:
1 – Channels list icon.
2 – List of channels to select.
Please select the channel you need from the list and click on it. After this, the connection with your streamer begins in the same way as described earlier. If you want to cancel the connection, simply press back button on your device.
Multichannel streamer
Wear OS screen mirroring can be single channel or multichannel. To start broadcasting in multichannel mode, please press Live broadcast button in the Options menu. The multichannel streaming feature allows you to broadcast content from your Wear OS device to multiple devices simultaneously in real time. This function splits audio and video signals and transmits content from the device screen to multiple devices. The type of viewing device does not matter and it can be: a Mac, a Windows PC or Linux PC, an iPhone, an Apple TV, an Android device, etc. The app will open Live broadcast window.
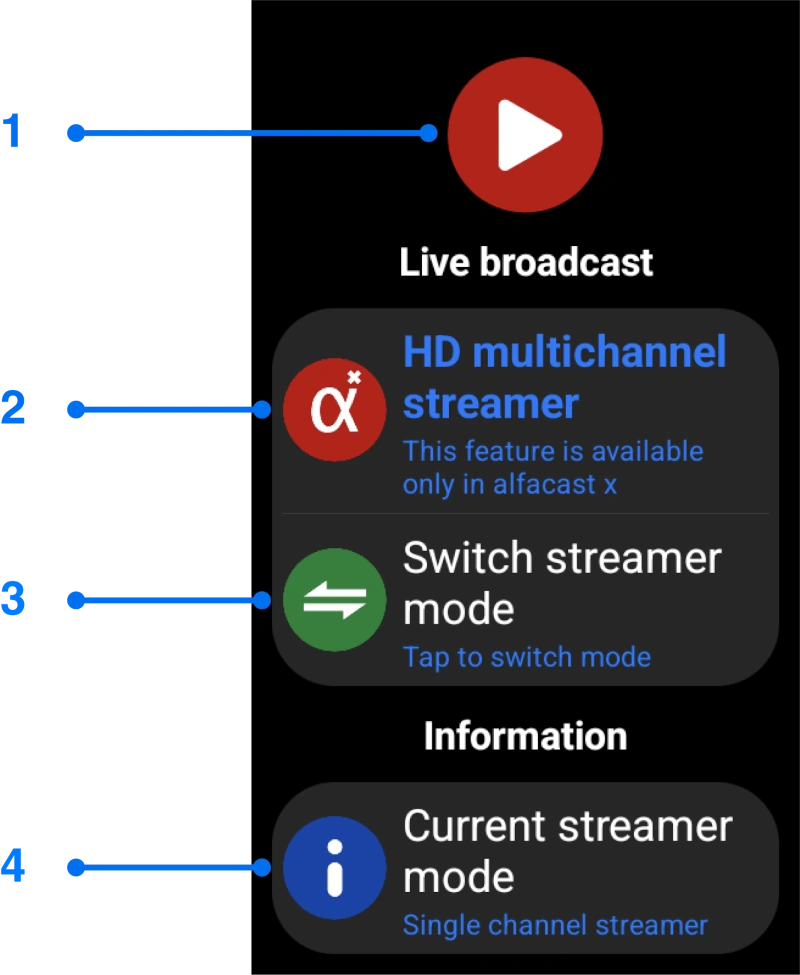
Figure 15. Live broadcast window
The Live broadcast window contains the following controls:
1 – Live broadcast icon.
2 – HD multichannel streamer button is a reminder that there is a more advanced, extended version of the app. This button is only available in the regular version of the app and is hidden in the extended version. Click this button to see options for switching to the extended version of the application.
3 – Switch streamer mode button. Click this button to change the streamer’s broadcast mode.
4 – Current streamer mode button. Description of the selected broadcast mode.
The Switch streamer mode button switches the streaming mode. Click this button to select a streaming mode in the Switch streamer mode window (see the image below).
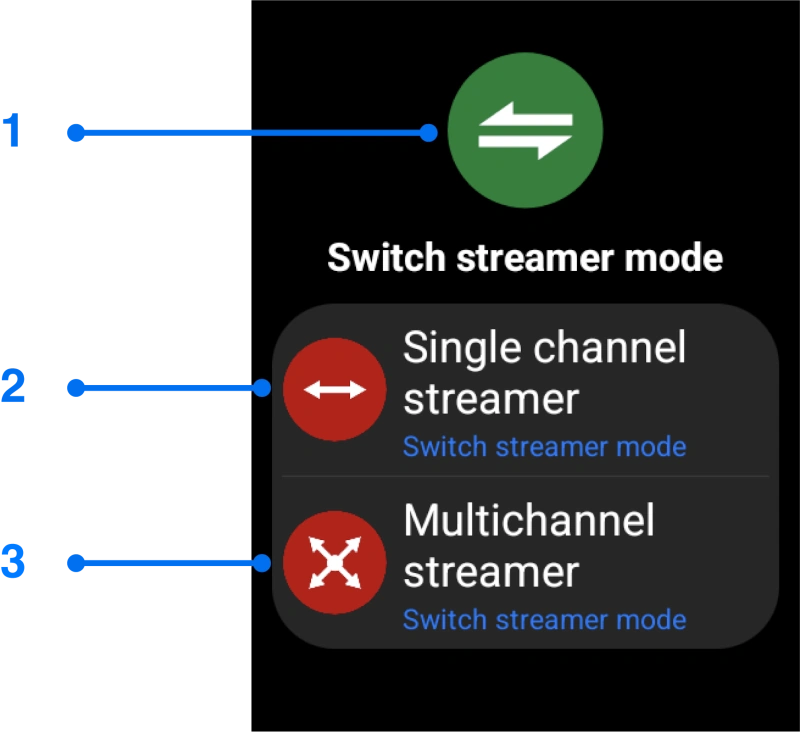
Figure 16. Switch streamer mode window
The Switch streamer mode window contains the following controls:
1 – Switch streamer mode icon.
2 – Single channel streamer button.
3 – Multichannel streamer button.
The Single channel streamer button switches the streamer’s broadcast mode to single channel mode. The Multichannel streamer button switches the streamer’s broadcast mode to multichannel mode. Select the broadcast mode you need from the provided options. When you select the multichannel broadcast mode, the application will ask for permission to access the audio device and to access the screen capture. We have already described the necessary steps for granting permissions earlier. Grant all necessary permissions to the application and broadcasting in multichannel mode will begin.
Each time you select a new streaming mode, the app updates its description under the Current streamer mode button in the Live broadcast window.
Click on the Current streamer mode button to see full information about the current streaming mode in a separate dialog box.
Incoming connection
The application supports displaying information about the current incoming connection. To display information about the current incoming connection, please connect to your Wear OS device from another device. You can use any device as a viewing device, such as an iPhone or Android smartphone, TV, Mac, Windows PC or Linux PC. After that click the Incoming connection button in the Options menu to open the Incoming connection window.
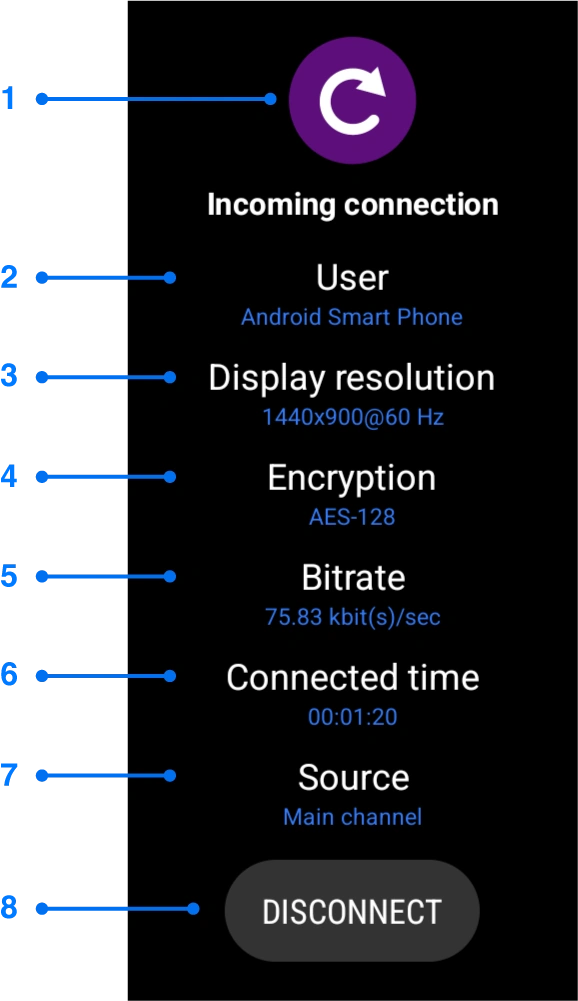
Figure 17. Incoming connection window in single channel mode
The Incoming connection window in single channel mode contains the following elements:
1 – Incoming connection icon.
2 – Name of the remote network node or alfaname.
3 – Display resolution of the connected network node.
4 – The encryption method used for this channel.
5 – Current bitrate on the channel.
6 – Channel connection time.
7 – Channel name.
8 – Disconnect button.
Elements 2 through 7 are static and simply display current broadcast information. The information in these fields is updated once per second. You can stop the Wear OS screen mirroring feature and finish the incoming connection on your device using the Disconnect button.
The Incoming connection window operates in two modes. The current window mode depends on the streamer’s current state: single channel or multichannel streaming. In multichannel streaming mode, Incoming connection window shows general information about the streamer, see the following figure.
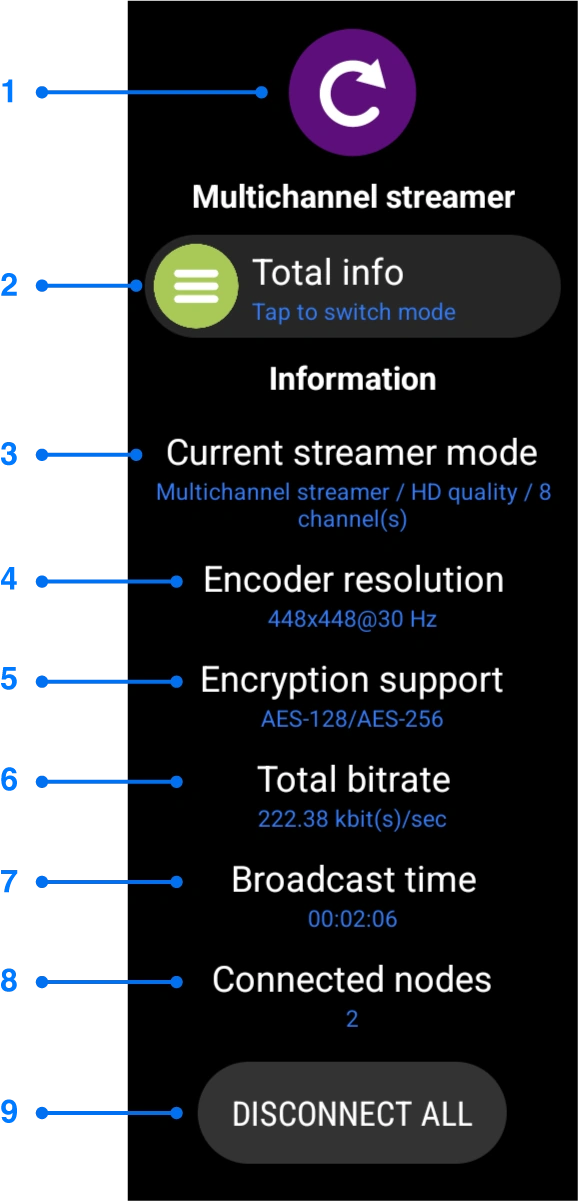
Figure 18. Incoming connection window in total info mode
The Incoming connection window in total info mode contains the following controls:
1 – Incoming connection icon.
2 – Display mode selection button. This button is used to select the mode for displaying stream information: total info mode or displaying info for a specific channel.
3 – Current broadcast mode of the multichannel streamer.
4 – Encoder resolution field. Current video encoder resolution.
5 – Encryption method field. The values for this field can be:
• “AES-128” – encryption using the AES-128 method.
• “AES-128/AES-256” – encryption using the AES-128 and AES-256 methods, for support regular and extended app versions.
6 – The full bitrate of broadcast stream. Total bitrate for all channels.
7 – Full broadcast time in multichannel mode.
8 – The number of network nodes currently connected to the multichannel streamer.
9 – Disconnect all button. The button to disconnect all connected network nodes.
Elements 3 through 8 are static and simply display current broadcast information. The information in these fields is updated once per second. Time is displayed in hours, minutes and seconds.
The regular application version has a video resolution limitation for multichannel streaming mode up to SCIF (256×144) quality. The extended version of the application can broadcast video up to HD (1280×720) quality in multichannel streaming mode.
To disconnect all connected network nodes from all channels, press Disconnect all button.
The regular version of the application always uses the AES-128 encryption method. Accordingly, in the regular version of the application, in multichannel broadcast mode, the encryption field will also be AES-128. The extended version of the application uses two encryption methods: AES-128 and AES-256. The extended version of the app supports AES-128 encryption for compatibility with the regular version of the app. Accordingly, in the extended version of the application, in multichannel broadcast mode, the encryption field will be AES-128/AES-256.
To display information on a specific channel, please select the channel using the Display mode selection button. After clicking this button, the application will show the following Channel selection window.
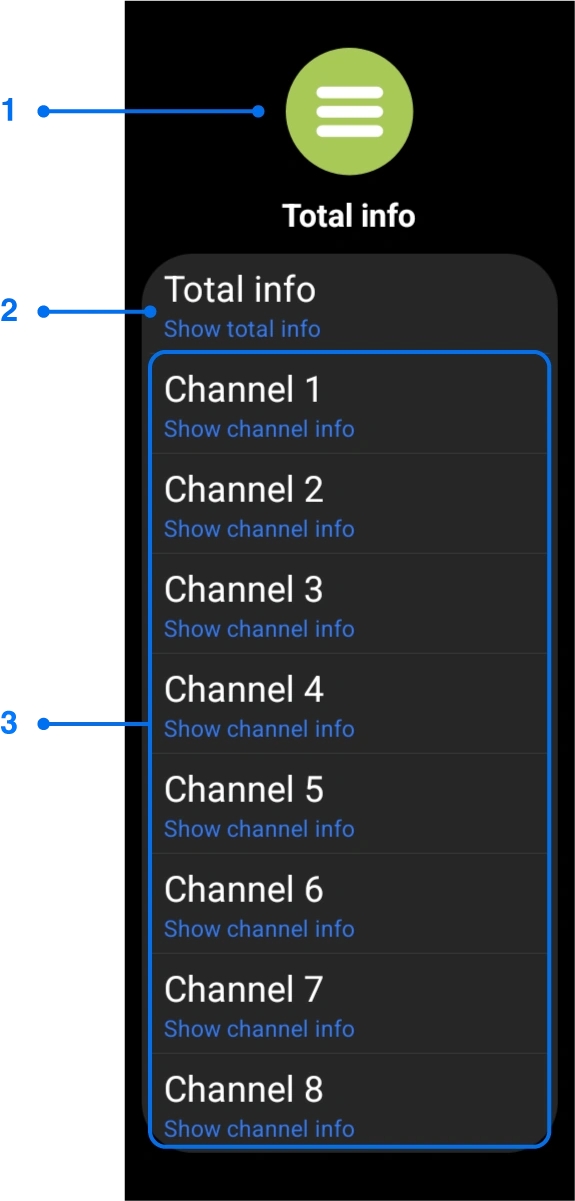
Figure 19. Channel selection window
The Channel selection window contains the following elements:
1 – Channel selection icon.
2 – Total info item.
3 – Channels list items.
If you select Total info item, the Incoming connection window will display full statistics for all channels, we have already described this mode above. If you select other items, the Incoming connection window will display information for a specific channel. In the following figure we show the Incoming connections window in specific channel info mode.
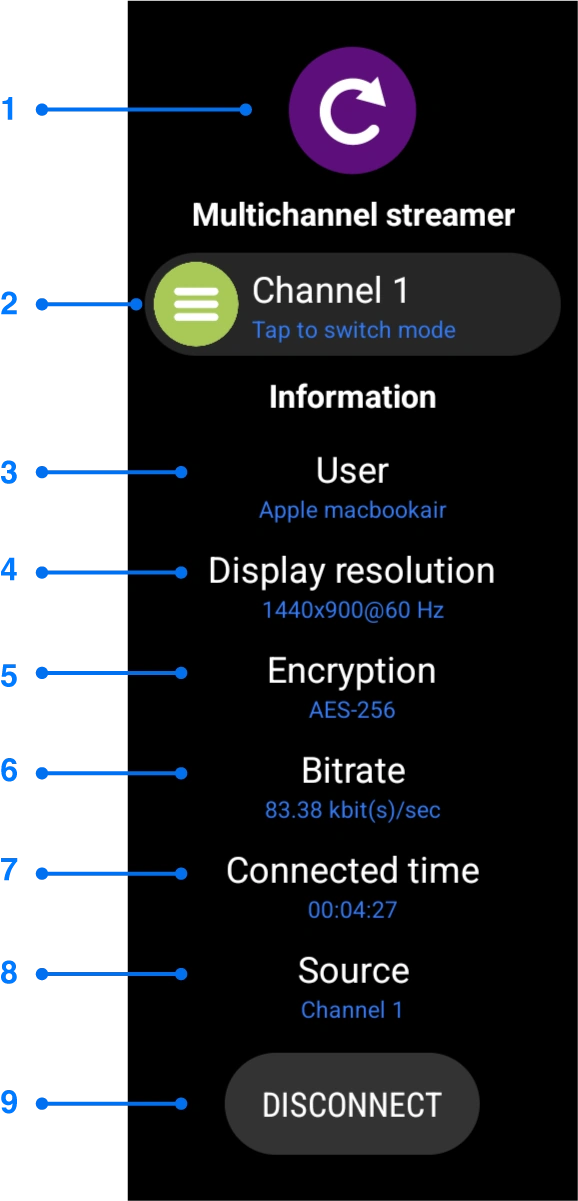
Figure 20. Incoming connection window in specific channel info mode
The Incoming connection window in specific channel info mode contains the following elements:
1 – Incoming connection icon.
2 – Display mode selection button. This button is used to select the mode for displaying stream information: total info mode or displaying info for a specific channel.
3 – Name of the remote network node or alfaname.
4 – Display resolution of the connected network node.
5 – The encryption method used for this channel.
6 – Current bitrate on the channel.
7 – Channel connection time.
8 – Channel name.
9 – Disconnect button.
The method of interaction with such a window is the same as for the Incoming connection window in single channel mode. The only difference from the single-channel mode is the presence of a Display mode selection button.
App instruction
There is a built-in instruction in the app. It is a short guide to understanding how to use the app. This instruction describes how to use Wear OS screen mirroring feature, including the basic steps to start streaming and viewing content from a remote screen. To display the Instruction window, press Instruction button in the Options menu or press on network node icon with “No streamers” label.
Figure 21. Instruction window
Please read the instruction before using the application. This instruction will cover some of the issues on using the Wear OS screen mirroring feature and how to fix them.
App settings
Today it is difficult to imagine the Wear OS screen mirroring function without settings. To fine-tune the application to your needs, use the Settings window. Click the Settings button in the Options menu to open the window. The Settings window contains several sections: general, streamer and viewer. General section – general application settings, these are the basic settings of the application. Streamer section – streamer application settings. Viewer section – viewer application settings.

Figure 22. Settings window
The Settings window contains the following elements:
1 – Settings icon.
2 – Avatar picture option. Click on the avatar image to change it.
3 – Alfaname option. This option is used to select the name of your network node.
4 – Audio capture option. This option enables or disables audio capture in the application.
5 – Video resolution option. This option provides list of supported resolutions for video display.
6 – Bitrate policy option. This option provides list of network bitrate policies.
7 – Playback method option. This option sets the delay time during playback.
8 – Video decoder option. List of video decoders for user selection.
The procedure for working with the Settings window is simple: please select the option you need, after that app will show separate window for the option, then click on desired value to apply changes. Press the back button on your device to exit the current settings window. The icon on the top of each window serves as a tooltip for the current setting.
An avatar image is an icon of your network node. This icon is displayed on the viewing device in the Main application window (the area of detected devices). In fact, this icon symbolizes your network node or Wear OS device, it is used to better perceive the different network nodes by the user. Click on the Avatar picture option, and the app will display the following Avatar selection window.
Figure 23. Avatar selection window
The Avatar selection window contains the following elements:
1 – Current avatar image.
2 – Select avatar option.
3 – Default option.
Click the Select avatar option to select an image from your photo library or files on your device. The app will show the standard image selection dialog. Please grant all necessary permissions for the app to access your files on your Wear OS device. Supported image formats for avatar selection: BMP, JPEG, and PNG. Click the Default option to reset the avatar picture to the default image. Once you select it, your new avatar image is automatically applied and sent to all devices running the alfacast app within your local network. The Current avatar image is updated every time you select a new avatar.
Alfaname is the name of your network node. This field looks like a nickname. This field has certain character requirements. Click the Alfaname option to edit it and review the requirements.
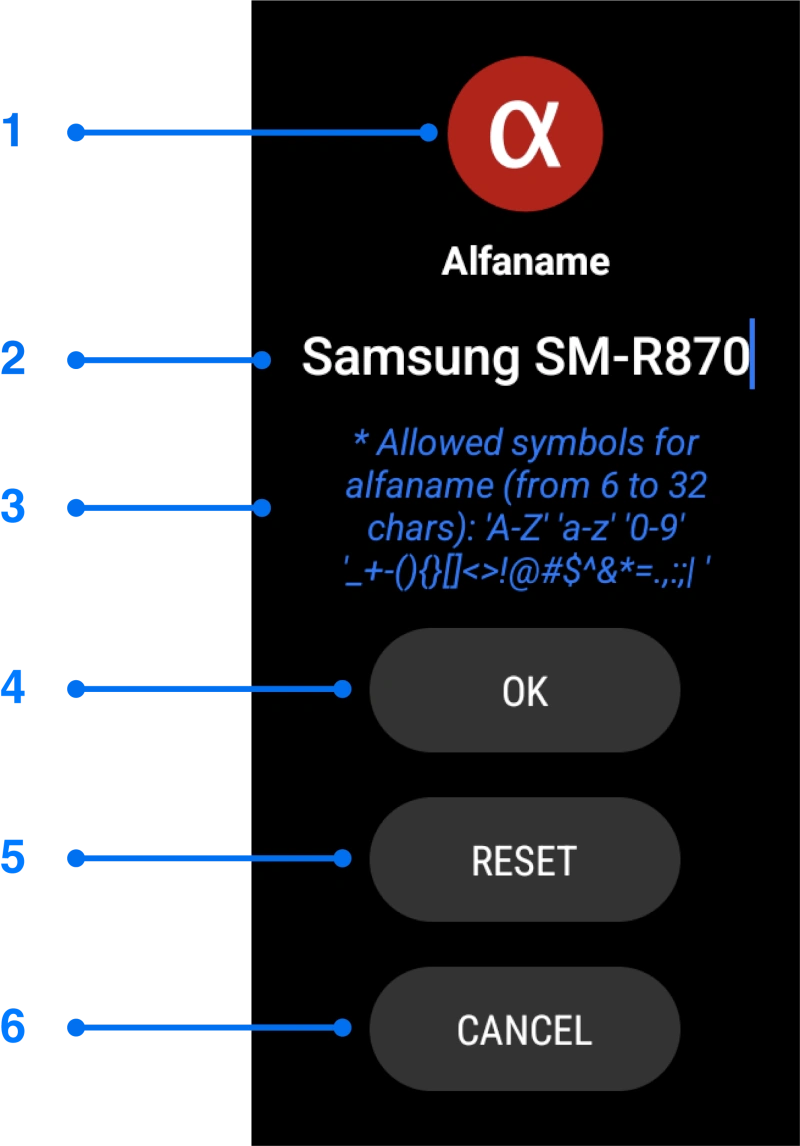
Figure 24. Alfaname window
The Alfaname window contains the following elements:
1 – Alfaname option icon.
2 – Current alfaname value.
3 – Description indicating the length and character limits used for alfaname.
4 – Ok button.
5 – Reset button.
6 – Cancel button.
Click on the Current alfaname value to modify it, the application will display the keyboard for entering text. Enter text using your device’s keyboard and click the Ok button to apply the changes. Click the Reset button if you want to reset alfaname to its default value. Click the Cancel button to close the current window and leave the alfaname value unchanged.
Using the Audio capture option, you can enable or disable audio capture. Click on the Audio capture option to display the following Audio capture window.
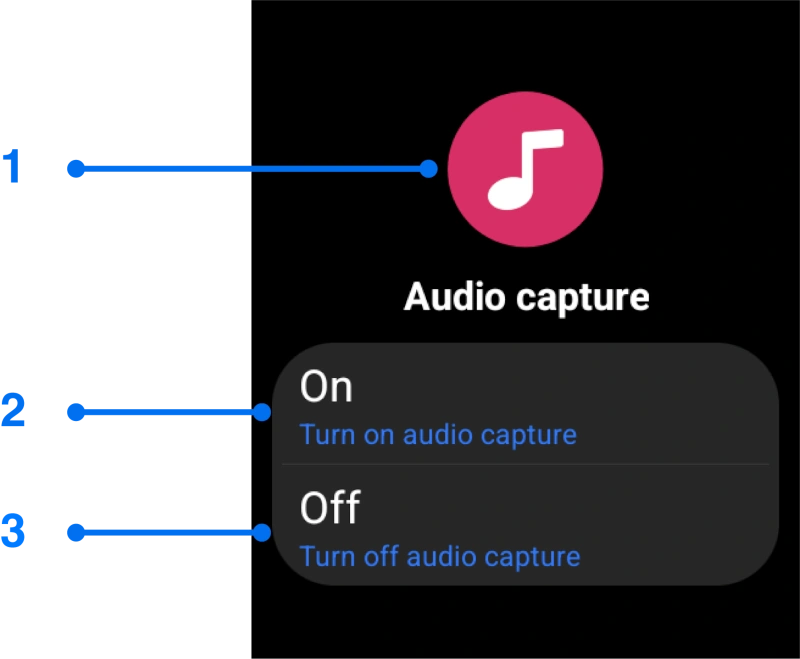
Figure 25. Audio capture window
The Audio capture window contains the following elements:
1 – Audio capture option icon.
2 – Turn on audio capture option.
3 – Turn off audio capture option.
If you disable audio capture, the app will only capture the device’s screen without audio support. Please note: screen capture cannot be disabled.
App supports audio capture only from default audio device: from the microphone or Bluetooth audio input device. There is not legal software way to capture system sound on Wear OS device for third party apps, this is Google Wear OS limitation. If you need to capture system audio on Wear OS, this is possible using the method described later in this user manual: see System audio capture section.
It is also possible to select the required video resolution of the encoder using the Video resolution option. Click on the Video resolution option to display the following Video resolution window.
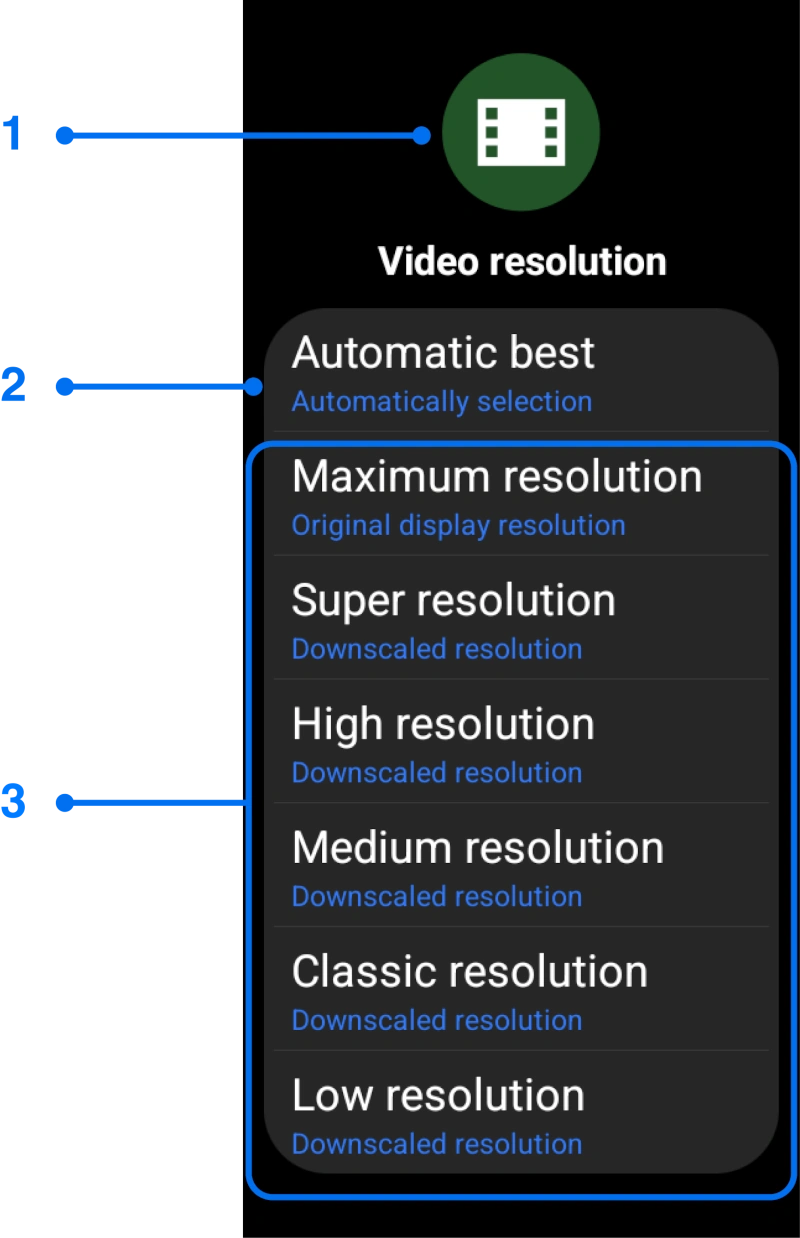
Figure 26. Video resolution window
The Video resolution window contains the following elements:
1 – Video resolution option icon.
2 – Automatic best option.
3 – List of downscaled video display resolutions.
This list includes video resolutions up to the maximum physical resolution of the display. If you select Automatic best option, the application will automatically determine the best resolution from all available ones. In fact, the exact resolution of the frame buffer (this buffer is used for image capture) cannot be determined in advance, so the resolutions in the list are presented as names: Maximum resolution, Super resolution, High resolution, Medium resolution, Classic resolution, Low resolution. The regular version of the application limits this value to the minimum resolution with 30 Hz frequency. The extended version of the application supports resolution up to 4k Ultra HD (3840×2160) with a frequency of 60 Hz.
Another useful feature is bitrate policy. Click on the Bitrate policy option to display the following Bitrate policy window.

Figure 27. Bitrate policy window
The Bitrate policy window contains the following elements:
1 – Bitrate policy option icon.
2 – Adaptive bitrate policy.
3 – Constant bitrate policy.
The bitrate policy can be adaptive or constant. Adaptive bitrate policy – adjusts the bitrate to network conditions. With the Adaptive bitrate policy enabled, the bitrate will change dynamically depending on the maximum network bandwidth. Constant bitrate policy – a consistent, high bitrate throughout the entire broadcast. Constant bitrate policy is useful when you are confident in your network’s bandwidth and always want excellent video quality. This option has an effect only for single channel broadcasting mode and does not affect multichannel mode. The multichannel streamer always operates with an Adaptive bitrate policy. The regular version of the application always uses the Adaptive bitrate policy.
The Playback method option can be used to reduce or increase the delay time between the streaming device and the viewer. Click on the Playback method option to display the following Playback method window.
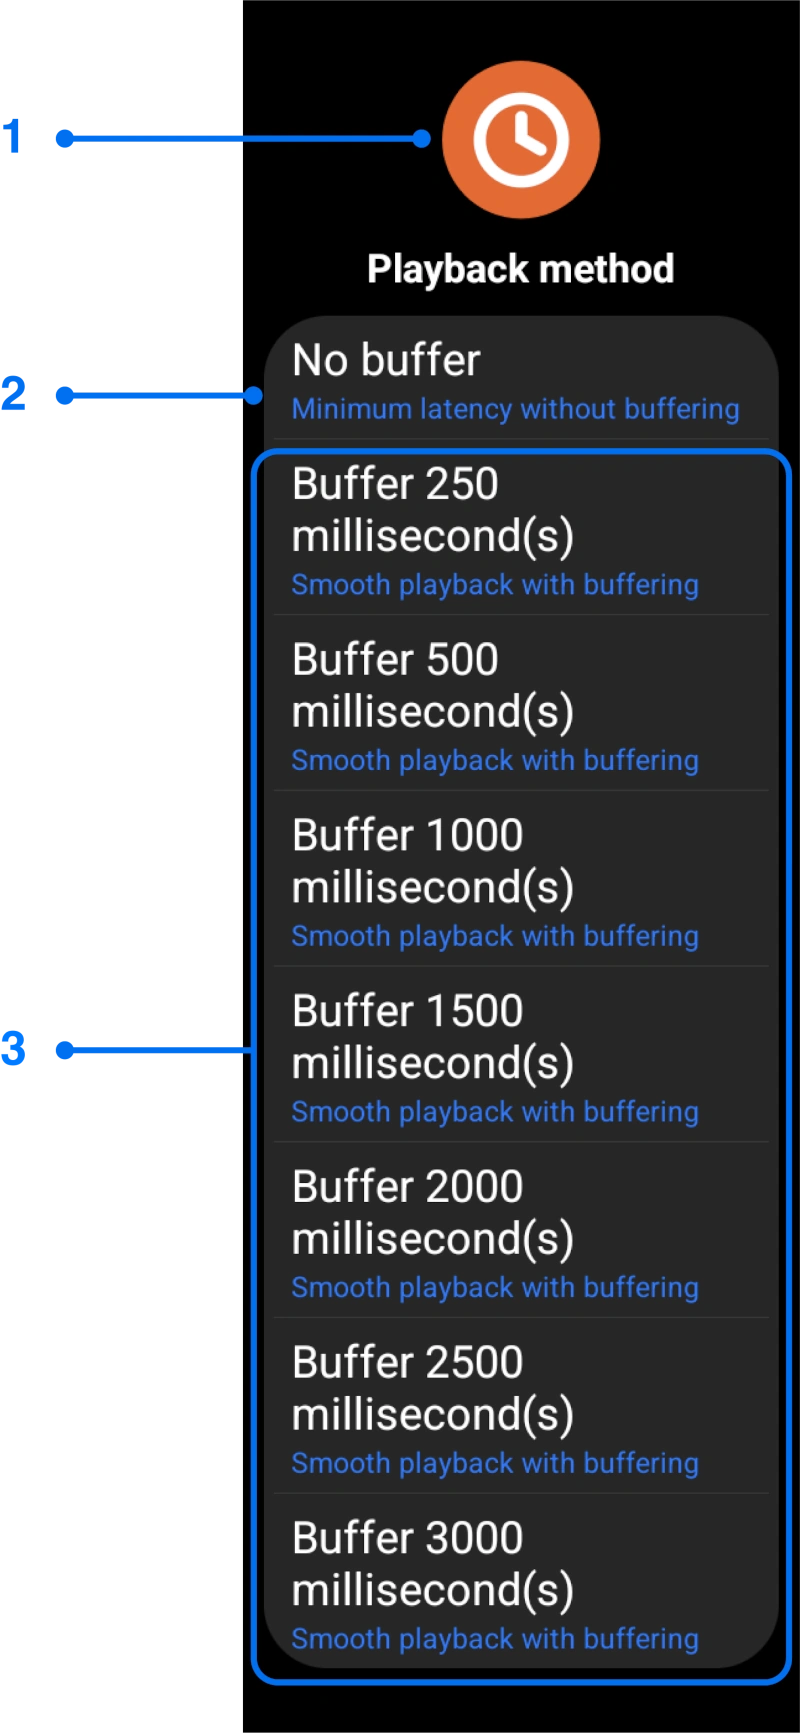
Figure 28. Playback method window
The Playback method window contains the following elements:
1 – Playback method option icon.
2 – No buffer delay. Minimum latency without buffering.
3 – List of playback delay values.
The delay time is adjustable from 0 (No buffer) to 3000 milliseconds (3 seconds). This is an approximate delay time. We recommend using a 500 milliseconds buffer. The No Buffer option provides minimal delay between the broadcasting and viewing devices, but synchronization problems and other audio and video artifacts may appear. In the regular version of the application, this option is always set to 3000 milliseconds.
The Video decoder option displays the video decoders supported by the application and the Wear OS. Click on the Video decoder option to display the following Video decoder window.
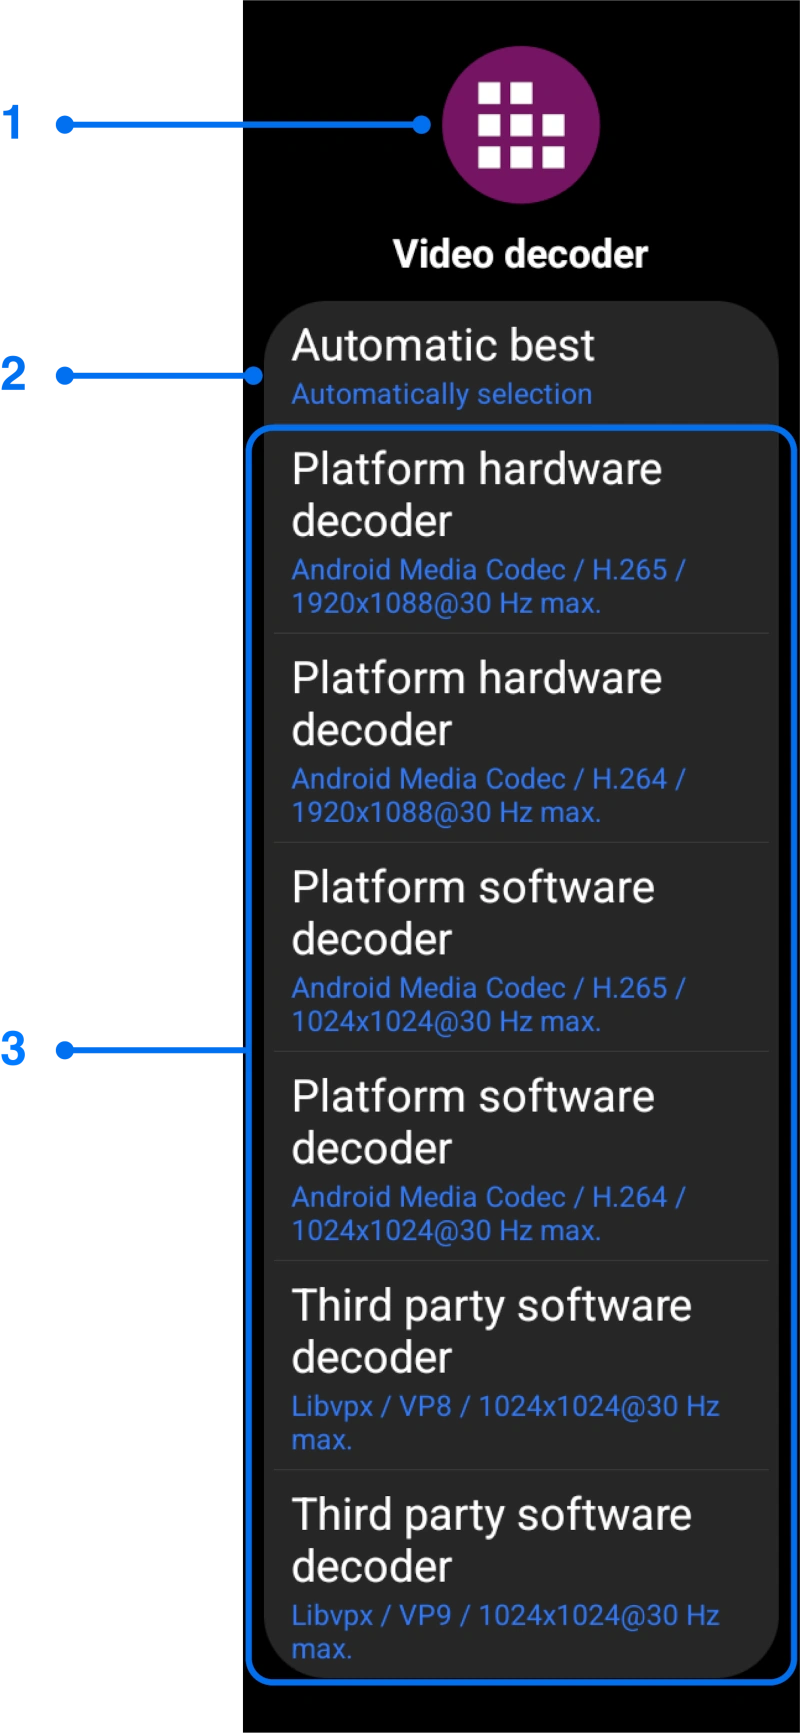
Figure 29. Video decoder window
The Playback method window contains the following elements:
1 – Video decoder option icon.
2 – Automatic best option.
3 – List of video decoders.
You can select any video decoder from the list and evaluate the image quality and bitrate of the stream. If you select a video decoder that is supported by your Wear OS device, but there is no similar video encoder on the streamer side, the application on the streamer side will automatically select the video encoder. In any case, the application automatically selects a video encoder on the streamer’s side. The regular version of the application limits this value to SCIF quality (256×256) with a frequency of 30 Hz. The extended version of the application allows viewing content up to 4k Ultra HD (3840×2160) quality with a frequency of 60 Hz.
System audio capture
As we mentioned earlier, there is no legal software way to capture system audio for third-party apps on Wear OS devices. There is one way to do this: make or purchase a loop device to capture sound through a Bluetooth headset: Audio Loopback Dongle (https://source.android.com/docs/core/audio/latency/loopback). The basic idea is this: you route the audio from your playback device to your capture device (the audio from your headphones to your microphone). We suggest using a Bluetooth headset because it is difficult to imagine that it is possible to connect any other audio input device to a Wear OS device. The main goal is to loop the playback device into the recording device. Our application already supports capturing sound from Bluetooth headset.
App update
The app supports automatic update checking. It periodically checks for new app version and notifies the user. Please update the application regularly as soon as possible. This will reduce software errors and make the Wear OS screen mirroring function more optimal in terms of performance and OS resources. You can also check for app updates manually by clicking the Update button in the Options menu. After clicking the button, the application will open the Update window shown in the following figure.
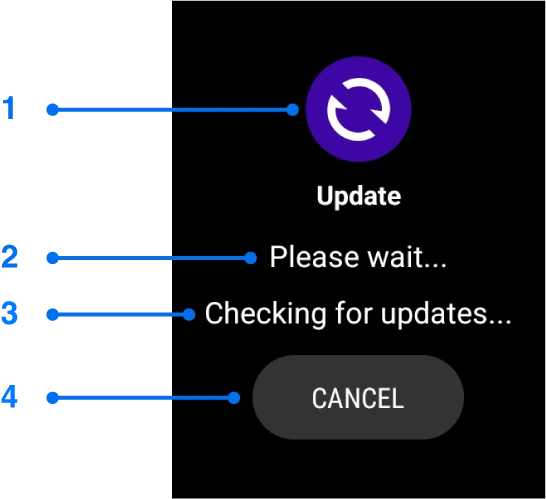
Figure 30. Update window. Checking for updates
The Update window contains the following elements:
1 – Update icon.
2 – Information field. The value of this field displays the current update status.
3 – Details field. The value of this field displays the current update status.
4 – Action button. Multifunctional button, its purpose changes during the update process. It can take the following names: Cancel button, Ok button – depending on the current update status.
Please wait some time to establish a connection with the update server. You can interrupt the checking at any time by clicking the Cancel button. If the current version is updated, the application will notify you about it.
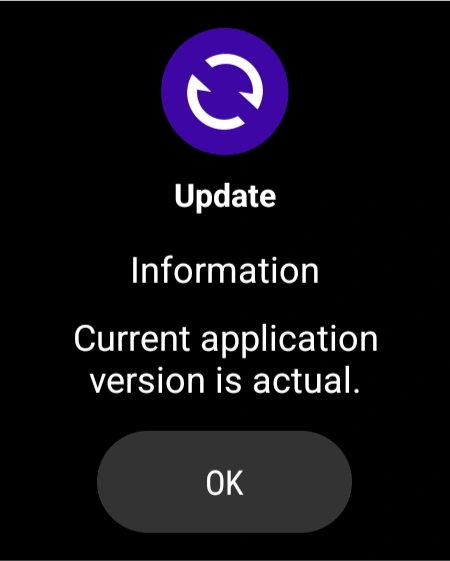
Figure 31. Update window. The current app version is actual
Click the Ok button to close the Update window. If a new version of the application is detected, the Update window will notify you as follows.
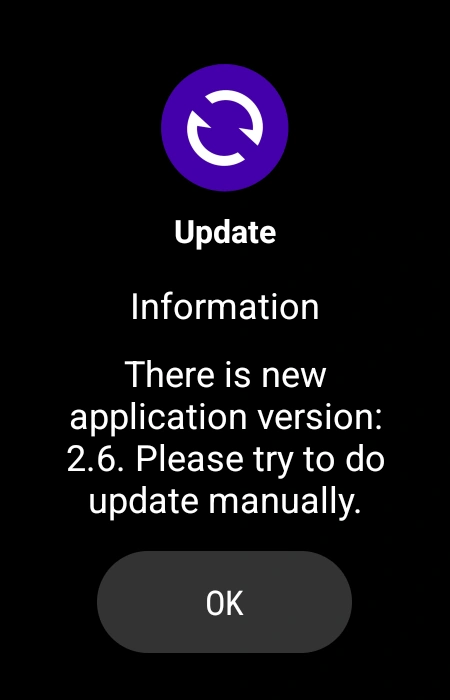
Figure 32. Update window. There is new app version
To install a new version of the application, you need to download it and install it as described earlier in this user manual. The app cannot update itself due to Wear OS limitations for apps not from the Google Play Market. The update system built into the application only notifies the user about the availability of a new version.
About
Information about the program can be found in the About window. To display the About window, press About button in the Options menu. We provide the following information about our Wear OS screen mirroring app: version, information about our project and website address. We also provide a link to our web site where you can get more information about the open source libraries used, authors, and the text of the open source licenses.
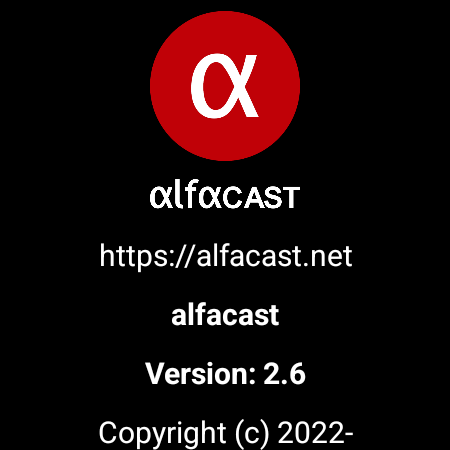
Figure 33. About window
Please read the program information if you are interested in details about our software.
App license key activation
To take full benefits of the extended version of the app, you must have an activation key. After installing the extended version, you will be able to enjoy a trial period. During this trial, you will be able to evaluate all the app’s features. You can purchase an activation key on our website. After purchasing, please enter the key into the app. To begin activation, click the License key button in the Options menu. You will see the window shown in the following figure.
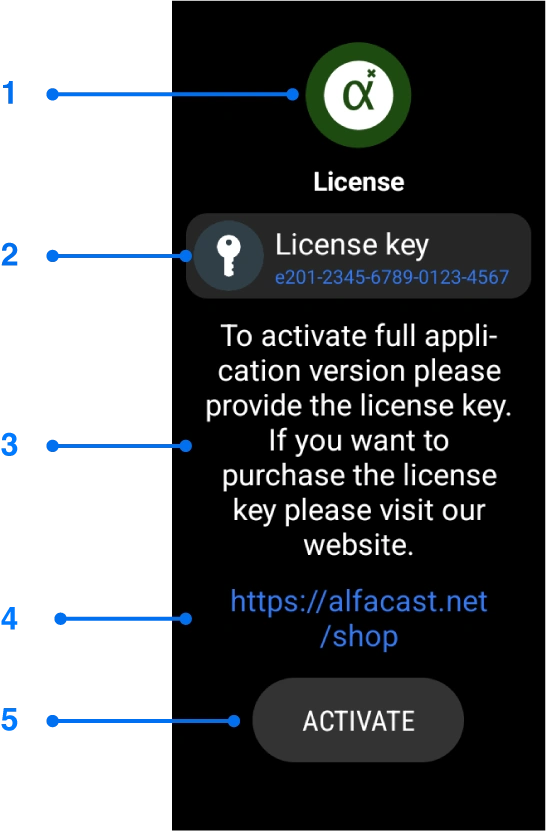
Figure 34. License window
The License window contains the following controls:
1 – Visit the store image button. Clicking this button displays an additional pop-up menu with a link to the site for purchasing a license key.
2 – License key field. Please provide a valid license key in the following format: xxxx-xxxx-xxxx-xxxx-xxxx (lowercase).
3 – Message about the need to activate a license key with information. Please read it.
4 – Information about the website where you can purchase a license key.
5 – Action button. Multifunctional button, its purpose changes during the update process. It can take the following names: Activate button, Ok button, Cancel button – depending on the current activation status.
After successfully purchasing a license key on the website, it must be activated. Enter your license key in the License key field. Click on the License key field to open the License key window.
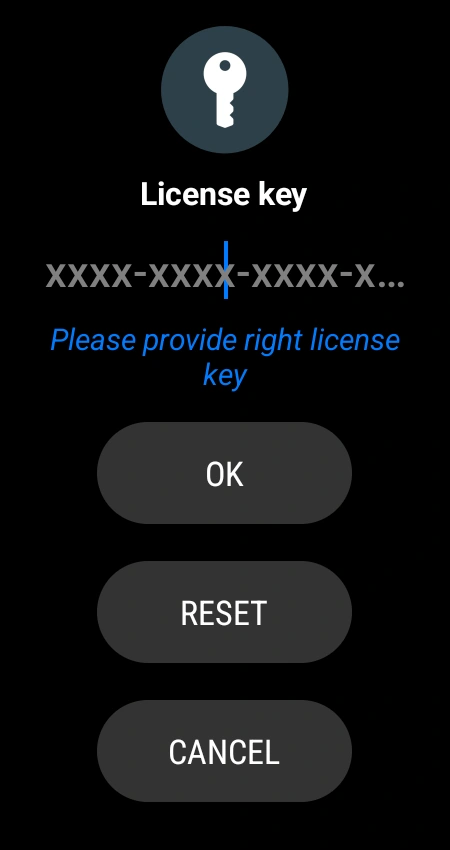
Figure 35. License key window
The License key window contains the following controls:
1 – License key entry field.
2 – Done button.
Click on the License key entry field. Enter your license key using your keyboard. Then click the Done button. The License key window will close. If you entered the correct license key, the License key field in the License window will be filled with your key. Next, click on the Activate button, this button will only become available after entering the correct license key. At the beginning of the activation process, the application will create the following dialog box with information about the activation.
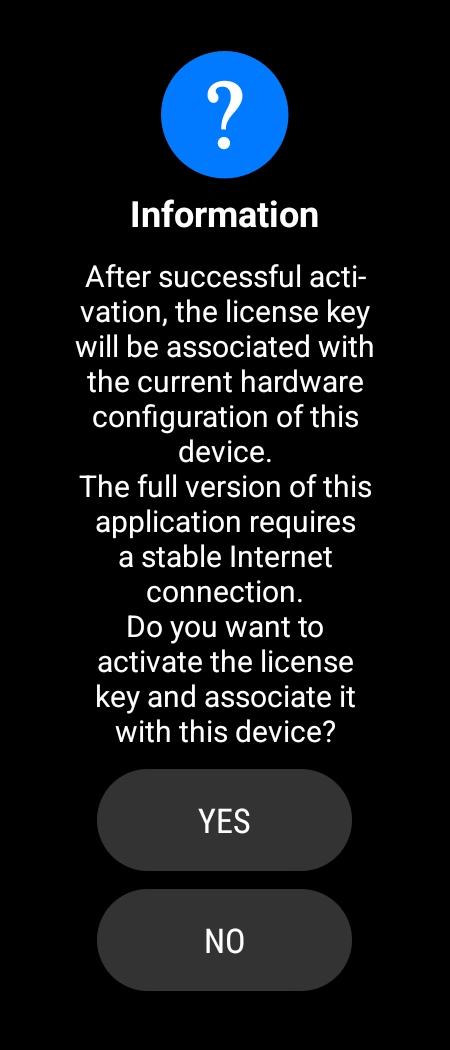
Figure 36. License key activation info
Please read the information provided in the dialog box to the end. If you agree to the terms, click the Yes button to begin the license key activation process. If you do not agree with the terms of license key activation, click the No button to finish and exit from the activation process. During the activation process, the License window will display the following elements, see the figure below.
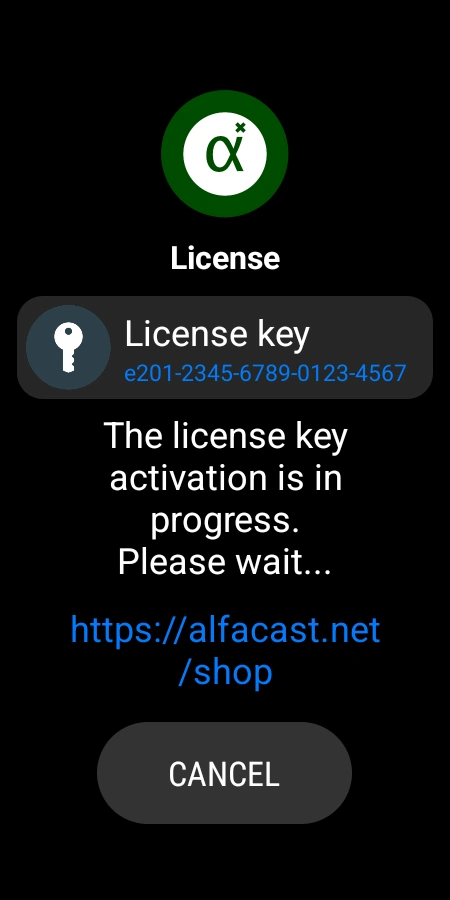
Figure 37. License window during activation process
The license key activation process takes some time, please wait until it is complete. Typically, it takes no more than 30 seconds. If you want to cancel the activation process, click the Cancel button. If the key activation process failed, carefully review the error message. If you can fix the activation error, then fix it yourself; if not, then contact the developer. After successful activation of the license key, the application will inform you about it, see the next window.
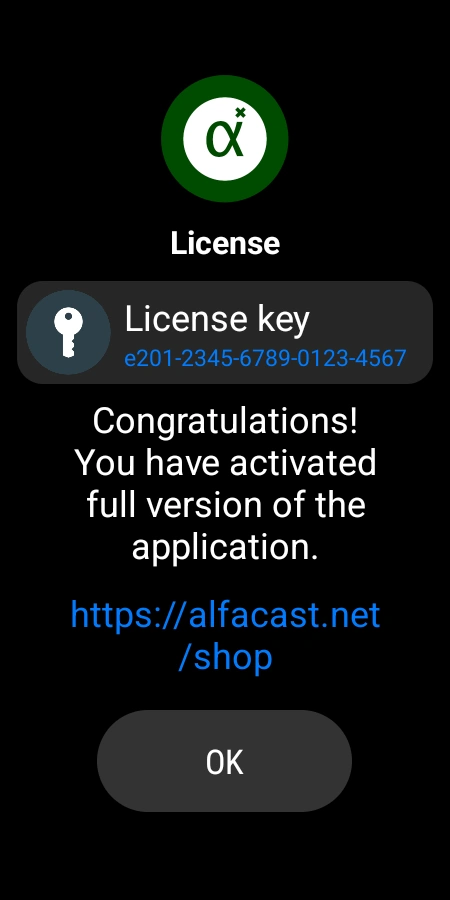
Figure 38. License window after successful activation
At this point, the license key activation process is complete. Click Ok button to exit the License window and start using the full version of the application.
Conclusion
We have fully described and reviewed alfacast application. Overall, the application is intuitive and easy to use. Alfacast app for Wear OS screen mirroring offers a wide range of features and functionality. There is a real-time streaming function. There is audio and video playback function. The connection is encrypted and secure. Each network node can broadcast its desktop content to multiple devices simultaneously. The extended version of the application has high quality video streaming feature up to 4K Ultra HD, it has low latency playback, more secure connection and other benefits. If you want to learn more about the application, you can watch the video on our YouTube channel.